Friday, November 23, 2012

CPP Crash Course


C++ Tutorial for Maggie
What does programming in C++ have anything to do with Cisco - you ask?

Nothing. But I must help Maggie to get her through the elective exam ;). Her professor chose C++ language as an introduction to programming (why is beyond me, Python would be so much better!)

Here's a gist of what you will need to know.

CPP 03 - Variables and Math Operators
CPP 04 - Taking User's Input
CPP 05 - If Else Condition
CPP 06 - Code Execution Control with Switch
CPP 07 - While Loop
CPP 08 - Do While Loop

CPP 08 - Do While Loop

Previous | C++ Home | Next


There is another way we can use to execute a part of code number of time. Look at the following syntax:

do {
    run_1st_statement;
    run_2nd_statement;
    etc. 
} while (expression);

The difference between this code and 'while' loop presented in the previous post is that this one will run the statements in the braces '{}' at least once. After they have been executed, the program checks the ' while (expression)'. If it's true (non-zero value), the program jumps back to the keyword 'do' and executes the code within the braces (1st and 2nd statement in my case). Then the ' while (expression)' is checked for true (non-zero value) or false (value of zero) again. If false, program continues and executes the statements that follow the 'do while' loop.

Let's use of this type of loop in our new program. It will be designed to convert USD and EUR currencies (homework in post CPP 06). Here are our assumptions:

  1. Program must present the user with a simple menu offering conversions of USD-to-EUR and EUR-to-USD. User must be able to pick one or the other.
  2. Use the currency rate: EUR 1 = USD 1.28921, and conversely USD 1 = EUR 0.775512
  3. Program should display the result and ask the user if he/she wants to do another conversion. If not, the program should terminate.
Here's my code (can be downloaded here):

Source Code 8.1

/* Program Converting Currencies 
version: 1.0
name: ex008.cpp
compilation: g++ -o ex008 ex008.cpp
author: Jarek Rek
*/

#include <iostream>

using namespace std;

int main () {

// Variables
float eur_is_usd = 1.28921;
float usd_is_eur = 0.775512;
float users_number;
float result;
int choice;
char users_answer;

/* ************ Here the Code Begins ************ */

do {
// Banner
cout << endl << endl;
cout << "      *******************************************\n";
cout << "             Program Converting Currencies       \n"; 
cout << "      *******************************************\n";
cout << endl;

// User's interface
cout << "\tYour options:\n";
cout << "\t---------------\n";
cout << "\t[1]\tConvert USD to EUR\n";
cout << "\t[2]\tConvert EUR to USD\n";
cout << "\nPlease choose the option [1]|[2]: ";

// Accept user's option
cin >> choice;

// Run code according to users choice
switch (choice)
{
case 1: 
cout << "\nNumber of USD to convert: ";
cin >> users_number;
result = users_number * usd_is_eur;
cout << "USD " << users_number << " is EUR "
<< result << endl;
break;
case 2:
cout << "\nNumber of EUR to convert: ";
cin >> users_number;
result = users_number * eur_is_usd;
cout << "EUR " << users_number << " is USD "
<< result << endl;
break;
default:
cout << "\nYour choice is not listed.\n";
}
cout << "Would you like to try another conversion [y|n]?";
cin >> users_answer;
} while (users_answer == 'y' || users_answer == 'Y');

cout << "\n\nThank you for using Currency Converter. See you next time!\n\n";
return 0;
}

Explanation
In the variables, I have created new data type called 'char'. It wil remember a single character you type on your keyboard. We will use it in our final 'while' statement. Now, all the code is enclosed in the 'do while' loop. Depending on the users' last answer 'y' or 'n', the code will either display menu all over again asking user for his/her choice, or it will terminate displaying the last thanks.

In the while statement I have used logical 'or' statement looking like to vertical lines '||' (one of lines like this is called 'pipe'). Take a look at this:
while (users_answer == 'y' || users_answer == 'Y');

The program interprets this as: if your answer is 'y' OR your answer is 'Y' (assumes either upper or lower case of your character). More on those later.

Homework
Re-write your previous program converting temperatures to ask the user if they want to do another conversion.

Thursday, November 22, 2012

CPP 07 - While Loop


Your computer is stupid. By now you realize it will not do anything useful until it is instructed step-by-step what to do. But it's fast. And what amazes me, it can do things over and over again without complaining. 

In this short post, let's make our computer do a dull thing a number of times using so called 'loop' mechanism. There is a number of ways we can perform a task number of times, so here is one of them:

while (expression) run_this_statement;

or, if there is more than one statement you want to execute, you can use the code inside the braces '{}':

while (expression) {
    run_this_statemet;
    run_that_statement;
    and_run_yet_another_statement;
}

Explanation
As long as the expression in the parentheses '()' is true, meaning non-zero value, the statement(s) will be executed. You typically use the 'while loop' when you do not know how many times you will be running the statements. I need to warn you however, that if you do not make the expression in the parentheses FALSE (zero) at certain point, your program will be looped forever. 

Take a look at the code below. The program is looped forever and can only be stopped by pressing CTRL-C (control and c keys simultaneously).

Pic. 1 - Source Code: ex007.1.cpp

Pic. 2 - Result's of Running the Program (Pic.1)

Explanation
Line 8-9
We define variables here.

Line 13-16
The 'while' keyword starts our loop. First, the 'while' statement checks if what's in the parenthesis is equal to ZERO (false) or NON-ZERO (TRUE). If true, all the code in the '{}' is executed top-to-bottom. Then program goes back to the top ('while' statement) and checks the expression in the parentheses is false (zero) or true (non-zero). If non-zero (true: in our code it is still 2), it executes all the commands in the braces '{}' again. This never ends because our variable in the parentheses 'loop_count' is always 2.

A quick fix to that endless loop of our code is to decrement the value of loop_counter variable every time we run the loop. Take a look at the code below:

Pic. 3 - Source Code: ex007.2.cpp

The last line in my 'while' loop is decremented by 1 each time the loop is run. That's why, program is only going to ask my name twice. 


Pic.4 - Result's of Running the Program (Pic.3)

First, loop_counter = 2. After running the code in '{}', the last line says:
loop_counter = loop_counter - 1;

Initial value of loop_counter = 2. This line is going to do simple math: 2 - 1 = 1. The result (1) is going to be assigned to the loop_counter variable, and the code jumps back up to the 'while' statement to check if the code should be run again. Since loop_counter is now 1 (truth), the code in braces is run again. 

The second run of the code will do the math: 1 - 1 = 0. The result(0 = false)) is  going to be assigned to the loop_counter, and the code jumps back up to the 'while' statement to check the value of the expression in the parentheses. Now, the value of loop_counter is zero (false). The code in '{}' is not run (program leaves the loop). The last statement is performed:

Line 20
return 0;
This will finish the program, and you get your command line prompt back.

Homework
Write a code that will ask the user: "How many planets does the Solar System have?
In response, the program should display 9 stars like this:
*********


Wednesday, November 21, 2012

CPP 06 - Code Execution Control with Switch


The 'case' statement is another way of running certain piece of code depending on user's choice. It is a nice way of creating quick menu. 

Let's write a program which converts the temperatures. Our formulas will be as follows :

Celsius-to-Fahrenheit
F = C * 9/5 + 32

Fahrenheit-to-Celsius
C = (F - 32) * 5/9

Type this code into your text editor, compile and run it.

Source Code - 6.1

/* Program Converting Temperatures 
version: 1.0
name: ex006.cpp
compilation: g++ -o ex006 ex006.cpp
author: Jarek Rek
*/

#include <iostream>

using namespace std;

int main () {

// Variables
float temperature;
float result;
int choice;

/* Here the Code Begins */

// Banner
cout << endl << endl;
cout << "      *******************************************\n";
cout << "             Program Converting Temperatures         \n";
cout << "      *******************************************\n";
cout << endl;

// User's interface
     cout << "\tYour options:\n";
cout << "\t---------------\n";
cout << "\t[1]\tConvert Celsius to Fahrenheit\n";
cout << "\t[2]\tConvert Fahrenheit to Celsius\n";
cout << "\nPlease choose the option [1]|[2]: ";

// Accept user's option
cin >> choice;

// Run code according to user's choice
switch (choice)
{
case 1: 
cout << "\nProvide number of degrees in Celsius: ";
cin >> temperature;
result = temperature * 9/5 + 32;
cout << temperature << " degrees of Celsius is "
<< result << " degrees of Fahrenheit.\n";
break;
case 2:
cout << "\nProvide number of degrees in Fahrenheit: ";
cin >> temperature;
result = (temperature - 32) * 5/9;
cout << temperature << " degrees of Fahrenheit is "
<< result << " degrees of Celsius.\n";
break;
default:
cout << "\nYou have provided wrong option.\n";
cout << "Program terminates.\n\n";
break;
}
return 0;
}

You can download this source code here but I insist you type it in.

Explanation
The main protagonists in this short story of mine are 'switch' and 'break' statements. 
The syntax is as follows:

switch (variable_number_or_character)
{
   case number_or_character:
      code_to_be_executed;
      break;

   case another_number_or_character;
      code_to_be_executed;
      break;


   default:
      code_to_be_executed_if_previous_options_did_not_work;
      break;
}

The 'break' statement will leave the block of code (jumps out of the braces '{}') upon executing the code for a lesson given case (user's choice).

If the user chooses something other than option '1', or option '2', the code under 'default' will be executed. Test it yourself.


You could also use 'continue' key word, but that I will explain next time. You may have noticed I added some comments in the code.

If you run the program you should have similar results:

Pic. 6.1 - Program Execution Option 1.


Pic. 6.1 - Program Execution Option 2.

Homework
1. Add comments to each of the cases used by the 'switch' statement.

2. Write a code that presents the banner Iike in my example), that converts currency:
a). Dollar to Euro
b). Euro to Dollar

Tuesday, November 20, 2012

CPP 05 - If Else Condition


C++ uses the concept of truth and false. Any expression (expression is anything that produces a value) that produces '0' (zero) is false, and a value other than zero is truth:

NOTICE!
Value of 0 = FALSE
Value other than 0 = TRUTH

This comes in handy just like certain true circumstances help us make decisions in life. "If were a rich man, I would spent more time on inventing my own stuff instead of doing what my company think is right".

We can use similar approach in order to execute a piece of code (truth) or ignore it (false). Check the code below:
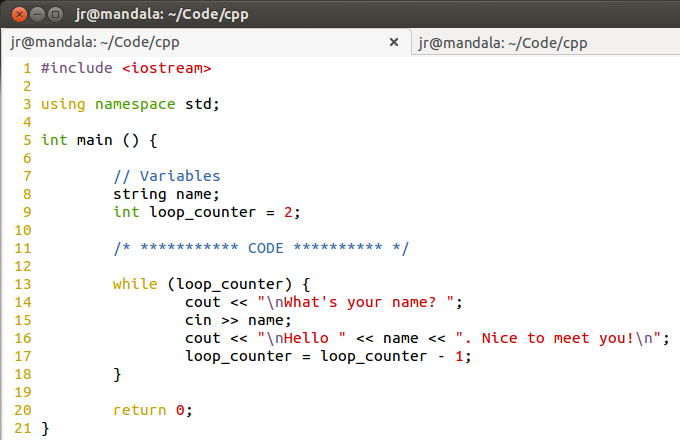
Pic. 5.1 -

Explanation
The statement that interests us here is:

if (expression_is_true) 
 run_this_code

If there is a block of code (more than one statement to execute we put the code in braces '{}' like in lines 15 through 18.

Another form of this statement is:

if (expression_is_true)
 run_this_code
else 
 run_that_code

The third one is using 'else if' as an extra condition if the previous ones did not work.

Let's run it a number of times and see what happens. While running it, we will change the truth (color) when asked. The results should be self explanatory. If the first condition is true (other than '0'), the code or code in block after if is run. If it is not true (is '0'), the code after else or else if is checked, until true condition is met.

There are two things in the code that require extra explanation. 

The variable type 'string' allows you to save a piece of text in the memory. The text (called string) must be enclosed with either double quotation (" ") or single quotation (' ') marks.

The operator '==' must be interpreted as 'is equal to' as opposed to operator '=' which assigns what's on the right of it to the left of it. If part of our code looks like below:

var1 = 1408;
this means that in the memory we store the number (or string, depending on the type) 1408.

var2 = 1408; 
this means that in the memory we store the number (or string, depending on the type) 1408.

var3 = 45;
this means that in the memory we store the number (or string, depending on the type) 45.

Now, if we try to compare the content of those variables, here is what happens:

var1 == var2;
returns TRUE, since both variables have the same values (or strings are identical).

var1 == var3;
returns FALSE, since the content of these variables is NOT identical.

Now, let's see how the code is executed depending on our answer:
Pic. 5.2 - Result

Homework
Write a code that uses 'if else' statement using different variations with one or more command to execute (then use braces '{}').

Monday, November 19, 2012

CPP 04 - Taking User's Input


Let's modify our previous program converting feet to meters by allowing a user to pick any number they want.

Pic. 4.1 - Feet to Meter Converter with User's Input.

Compile and run the code. It should give you something similar to mine:

Pic. 4.2 - Code Results.

Explanation

Take a look at the line 17 in the code above. It contains the keyword 'cin >>' followed by the variable name. This command stops the program until user provides the number. It then, is stored in the variable number_of_feet. The rest should be self explanatory.

NOTICE!
The keyword 'cin' stands for: console input (from your keyboard). It is followed by '>>' and the variable name (kind of like saying send it to ...).
The keyword 'cout' stands for: console output (to your screen). It is followed by '<<' (kind of like saying whatever follows send to the screen).

Homework

Exercise 4.1
Write a program that converts the meters to feet. User should be prompted for the number of meters to convert.

Wednesday, November 7, 2012

Lab 208 - IPv6 NAT-PT

Prerequisites: CCNP level skills.

Note!
If interfaces have not been configured with IPv6 addresses yet, use fc00:1:1::/64 as the network-ID and ::x, as a host ID (where x=router-ID).

Topology

Pic 1. IPv6 Topology Diagram.

Task 1
Vlan 113 runs IPv4 protocol (203.0.113.0/24). Configure R3 in such a way that 
R2 should ping 2001::CB00:71FE to reach 203.0.113.254 address (BB1).
You are allowed to use one static route on R2 to accomplish the goal.

Solution

Task 1
Vlan 113 runs IPv4 protocol (203.0.113.0/24). Configure R3 in such a way that 
R2 should ping 2001::CB00:71FE to reach 203.0.113.254 address (BB1).
You are allowed to use one static route on R2 to accomplish the goal.

R2 Config:
!
ipv6 route 2001::/96 FC00:1:1:20::3
!

R3 Config:
!
interface Serial1/0
 ipv6 address FC00:1:1:20::3/64
 ipv6 nat
 ipv6 ospf 1 area 13
!
interface FastEthernet0/0
 ip address 203.0.113.3 255.255.255.0
 speed 100
 full-duplex
 ipv6 nat
!
!
ipv6 nat v6v4 source FC00:1:1:20::2 203.0.113.2
ipv6 nat v4v6 source 203.0.113.254 2001::CB00:71FE
!
ipv6 nat prefix 2001::/96
!

Verification:
Pic. 2 - Ping Test from R2.


Pic. 3 - IPv6 NAT Table.

Lab 207 - IPv6 Access Control List

Prerequisites: CCNP level skills.

Note!
If interfaces have not been configured with IPv6 addresses yet, use fc00:1:1::/64 as the network-ID and ::x, as a host ID (where x=router-ID).

Topology

Pic 1. IPv6 Topology Diagram.

Task 1
Enable HTTP service in R3. Check if Vlan 27 can access the service.

Task 2
Configure filtering in R3 blocking access to HTTP server if the packets are sourced by Vlan 27. All remaining IPv6 networks should be able to access this service.

Solution

Task 1
Enable HTTP service in R3. Check if Vlan 27 can access the service.

R3 Config:
!
ip http server
!

Verification:
Pic. 2 - HTTP Access from Vlan 27.

Task 2
Configure filtering in R3 blocking access to HTTP server if the packets are sourced by Vlan 27. All remaining IPv6 networks should be able to access this service.

R3 Config:
!
ipv6 access-list VLAN27_BLOCK_HTTP
 deny tcp FC00:1:1:1B::/64 any eq www
 permit ipv6 any any
!
interface Serial1/0
 ipv6 address FC00:1:1:20::3/64
 ipv6 traffic-filter VLAN27_BLOCK_HTTP in
 ipv6 ospf 1 area 13
 serial restart-delay 0
!

Verification:
Pic. 3 - HTTP Access from Vlan 27.

Pic. 4 - HTTP Access from R1.


Saturday, November 3, 2012

Lab 206 - IPv6 Protocol Redistribution

Prerequisites: CCNP level skills.

Note!
If interfaces have not been configured with IPv6 addresses yet, use fc00:1:1::/64 as the network-ID and ::x, as a host ID (where x=router-ID).

Topology

Pic1. IPv6 Topology Diagram.

Task 1
Enable OSPFv3 Area 215 on R1's Fa0/1 interface.
Enable RIPng protocol between R1 and R2. R1 should run RIPng on its Fa0/0 and Se0/1 interface.
R2 should run RIPng on its Se0/1 interface.

Task 2
Enable EIGRPv6 between R2 and SW1. R2 should be running EIGRPv6 on its Fa0/0 interface, and SW1 on Vlan 7, Vlan 27, Vlan 79, and Vlan 107.

Task 3
Ensure IPv6 connectivity between all three routing domains (RIPng, EIGRPv6 and OSPFv3).

Solution

Task 1
Enable OSPFv3 Area 215 on R1's Fa0/1 interface.
Enable RIPng protocol between R1 and R2R1 should run RIPng on its Fa0/0 and Se0/1 interface.
R2 should run RIPng on its Se0/1 interface.

R1 Config:
!
interface FastEthernet0/0
 ipv6 address FC00:1:1:86::1/64
 ipv6 rip 12 enable
!
interface FastEthernet0/1
 ipv6 address FC00:1:1:D7::1/64
 ipv6 ospf 1 area 215
!
interface Serial0/1
 ipv6 address FC00:1:1:C::1/64
 ipv6 rip 12 enable
!

R2 Config:
!
interface Serial0/1
 ipv6 address FC00:1:1:C::2/64
 ipv6 rip 12 enable
!

Task 2
Enable EIGRPv6 between R2 and SW1R2 should be running EIGRPv6 on its Fa0/0 interface, and SW1 on Vlan 7, Vlan 27, Vlan 79, and Vlan 107 interfaces.

R2 Config:
!
ipv6 router eigrp 1
 no shutdown
!
interface FastEthernet0/0
 ip address 172.16.27.2 255.255.255.0
 speed 100
 full-duplex
 ipv6 address FC00:1:1:1B::2/64
 ipv6 eigrp 1
!

SW1 Config:
!
ipv6 unicast-routing
!
ipv6 router eigrp 1
 no shutdown
!
interface Vlan7
 ipv6 address FC00:1:1:7::7/64
 ipv6 eigrp 1
!
interface Vlan27
 ipv6 address FC00:1:1:1B::7/64
 ipv6 eigrp 1
!
interface Vlan79
 ipv6 address FC00:1:1:4F::7/64
 ipv6 eigrp 1
!
interface Vlan107
 ipv6 address FC00:1:1:6B::7/64
 ipv6 eigrp 1
!

Task 3
Ensure IPv6 connectivity between all three routing domains (RIPng, EIGRPv6 and OSPFv3).

R2 Config:
!
ipv6 router eigrp 1
 no shutdown
 redistribute ospf 1 metric 1 1 1 1 1 include-connected
 redistribute rip 12 metric 1 1 1 1 1 include-connected
!
ipv6 router ospf 1
 log-adjacency-changes
 redistribute eigrp 1 metric 30 include-connected
 redistribute rip 12 metric 30 include-connected
!
ipv6 router rip 12
 redistribute ospf 1 metric 5 include-connected
 redistribute eigrp 1 metric 5 include-connected
!

Verification:
On R1, R2, R3, R4, R5, R6, SW1, SW2 the following ping script (works):

foreach address {
FC00:1:1:7::7
FC00:1:1:1B::7
FC00:1:1:4F::7
FC00:1:1:6B::7
FC00:1:1:1B::2
FC00:1:1:C::2
FC00:1:1:20::2
FC00:1:1:22:8000::1
FC00:1:1:22:9000::1
FC00:1:1:22:A000::1
FC00:1:1:22:B000::1
FC00:1:1:86::1
FC00:1:1:D7::1
FC00:1:1:C::1
FC00:1:1:20::3
FC00:1:1:2D::4
FC00::4
FC00:1:1:45::4
FC00:A:A:A::4
FC00:1:1:D7::5
FC00:1:1:45::5
FC00::6
FC00:1:1:2D::6
FC00:A:A:A::6
FC00:1:1:D7::8
} { ping $address }

How to use the script:
R1#tclsh
here paste the script and hit ENTER.

Then:
R1(tcl)#tclquit

CPP 03 - Variables and Math Operators


Everything in your computer is a stored as a number (binary digits to be precise, but don't be bother by that now). I know it's weird since your Facebook's page, your music, or movie you are watching on your computer do not look like numbers at all. They are. Trust me on this.

When you write programs you will need to store a lot of information, such as text (we will call these pieces of text 'strings of characters', or simply 'strings'. Also, we will keep a lot of actual numbers. But how to store these strings or numbers in computer's memory to be able to retrieve them and do some manipulation? The answer is to keep them in a so called 'variable'. You can think of a variable as a sort of a box or container in computer's memory where your data will be kept. 

In order to use a variable the C++ compiler must know what type of data you will store in this box. Let's introduce a few of data types (more on these in a later lesson):
  • int - will store whole numbers (e.g. 10, -500, 1234, 0,  etc.)
  • float - will store fractions (e.g. 1.45, -34.1, 3.14159, etc.)
  • char - will store characters (e.g. c, r, %, 5, 13, @, etc.)
Notice
Numbers can also be treated as characters (each character on your keyboard has a special number in so called ASCII codes). Then, compiler does not treat them literally, as quantity but as a number they represented in ASCII codes.

Since the code you write will be run from top to bottom (for now), C++ compiler must know the type of variables and there names before your program begins to use them. We will always declare them at the top of our program.

Another thing I'd like you to learn in this lesson is the basic math operators. Here they are:
  • + is used for addition
  • - is used for subtraction
  • * is used for multiplication
  • / is used for division
  • % is so called modulus providing a remainder of dividing two integers (8 % 3 = 2, since 8 divided by 3 is 2, remainder 2).

Now, we're ready to write some code (do not type the numbers on the left). Save it as ex003.cpp, compile and run.

Pic. 3.1 - The Code ex003.cpp

Explanation
Refer to the picture 3.1 containing the code.

Line 1
This line contains a comment which is a piece of text that the compiler ignores. You should comment on every piece of code so you can help the reader (including yourself) understand what you are doing. There are two types of comments used in C++. First is the one below:

/* here goes your text
    which can span many
    lines
*/

Second type of comment cannot span multiple lines and looks like this

// here comes your comment
It is a good practice for a beginner to start writing program using just comments in their native languages and then fill in the C++ statements.

Line 3
#include <iostream>
This directive will inform the compiler that iostream library (a big chunk of code written by somebody else) will be added to your code so that you can use a lot of statements such as 'cout <<' and your compiler understands what to do.

Line 5
using namespace std;
Just assume you need this for the compiler to do its magic (I cannot explain everything now).

Line 7
main () {
This is so called main function. All programs in C++ must start in the function main (more on functions in the upcoming lessons). The left brace '{' is a starting point of our code. The function and the code must end with the right brace '}' which is our line 15.

Line 9

int  number_of_feet = 30;   // variable storing the number of feet

This line defines (it means declares the variable and puts some content in it) the variable called 'number_of_feet' and assigns it a value of 30. This means that compiler will allocate a piece of computer's memory to store the value and will mark where it is with the name 'number_of_feet', so you can easily refer to it later in your program. Let's break it down even more:
  • int - type of variable (what your box in the memory will store: here integer which means that no fractions are allowed).
  • number_of_feet - the name of the variable (so that you can refer to the content of that box in the memory later).
  • = - will take what is on its right side (here: 30) and assigns (stores) in the memory labeled with the name on its left side (here the piece of memory is labeled with the name, kind of address called: number_of_feet).
  • // - Comment of the programmer as to what this line is supposed to do.
Line 10
float ratio = 0.3048;       // number used to convert feet-to-meters
This line defines a type of 'float' variable called ratio and assigns a value of 0.3048.
The difference between the variable definition and declaration is that the former creates this sort of a labeled box in the memory and immediately stores something in it, and the latter only reserves the memory and does not put any content in it (creates this box in the memory to store the type of data you want but it now contains some random garbage). Example:

int my_first_number = 1; // Definition 
int my_second_number;  // Declaration 

Line 12
cout << number_of_feet << " of feet is " << number_of_feet * ratio << endl;
This line uses instruction 'cout <<' to send to your screen what follows. Pay attention here. 
  • cout << number_of_feet - will send to screen the content of the memory labeled with this variable name. Notice that there is no semicolon ';' after the variable name.
  • << " of feet is " - text between quotes (including spaces) will be displayed right after the content of the memory (variable) storing your number of feet
  • << number_of_feet * ratio - now, your computer will multiply what is stored in both variables (in our case 30 * 0.3048) and will display the result to the screen
  • << endl; - finally system will hit enter creating new line (your cursor goes to new line) and the whole statement ends with semicolon ';' as per C++ requirement.
Line 14
Function 'main()' will return code 0 (all is good) to your operating system when the codes in the function ends (code is between { } - lines 7 through 15)

Line 15
}
This right brace says this is the end of the block of code in function main().

Homework

Exercise 3.1
Write the code that converts 42 degrees of Celsius to its equivalent in Fahrenheit. When saved, compiled and run, the result should look similar to mine in the picture below.
Formula you should use is: Celsius * 9/5 + 32.
The result should be: 42 Degrees of Celsius = 107.6 Degrees of Fahrenheit.

Pic. 3.2 - Homework3.1 Result.