Friday, January 31, 2014

OSPF Path Selection with Auto-Cost


Task 1
Remove configuration from the previous lab.

Task 2

You will need to prepare for the migration towards 10Gbps. As a test, you have been asked to change the metric on R6 so that a 100Mbps link should have a metric of 100 instead of 1 (default).

Task 3
If the result of the configuration is satisfactory, restore the default cost calculation on R6.

Questions
Try to answer the following questions:
  1. What are the options to change OSPF metric in an consistent manner?
Lab Solution

Solution configuration can be accessed below; solution contains task 1 and task 2 (if you want to save it, click the link, then go to File-->Download):
https://drive.google.com/file/d/0BwE5C95tpjZOM3NWTTA5UktFdW8/edit?usp=sharing

Task 1
Remove configuration from the previous lab.

R1 Config:
!
router ospf 1
 no neighbor 172.16.0.4 cost 100
!

Task 2

You will need to prepare for the migration towards 10Gbps. As a test, you have been asked to change the metric on R6 so that a 100Mbps link should have a metric of 100 instead of 1 (default).

R6 Config:
!
router ospf 1
 auto-cost reference-bandwidth 10000
!

Note!
As soon as you change the default auto-cost reference-bandwidth, you get the warning as shown below. The same configuration should be applied on all routers in the OSPF domain. In our case it is just a quick test, so we will revert this back to the default value.


Pic. 2 - Warning.


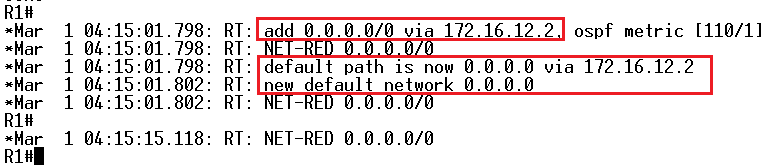
Pic. 3 - New Metric on R6.


Task 3
If the result of the configuration is satisfactory, restore the default cost calculation on R6.

R6 Config:
!
router ospf 1
 no auto-cost reference-bandwidth 10000
!

Pic. 4 - Metric on R6 Restored.


Study Drill

If a network designer wants to apply consistent metric in Cisco OSPF domain, there are two common solutions in use. In the first one, a consistent bandwidth-to-cost conversion table can be created similar to the one STP uses. Then, the designer can use 'ip ospf cost' command throughout the domain to manually apply the costs on every interface. Alternatively, every router can have the value of auto-cost reference-bandwidth changed using the new value (default = 100, representing 100Mbps).  

Thursday, January 30, 2014

OSPF Path Selection with Neighbor Cost


Task 1
Remove Task 2 configuration from the previous lab.

Task 2

The following prefixes (marked in red rectangle) are advertised by both R3 and R4 (pic. 2). Configure R1 so that it prefers R3 towards these destinations. R4 should only be backup router in case frame-relay circuit towards R3 is down.


Pic. 2 - Prefixes Advertised by Both R3 and R4.


Questions
Try to answer the following questions:
  1. If the task did not stipulate that the configuration had to be done on R1, what would be the alternative methods of accomplishing the same goal?
Lab Solution

Solution configuration can be accessed below (if you want to save it, click the link, then go to File-->Download):
https://drive.google.com/file/d/0BwE5C95tpjZOak0wQ3AzUTEtaFE/edit?usp=sharing

Task 1
Remove Task 2 configuration from the previous lab.

R2 Config:
!
interface fastethernet0/0
 no bandwidth 10
!

Task 2

The following prefixes (marked in red rectangle) are advertised by both R3 and R4 (pic. 2). Configure R1 so that it prefers R3 towards these destinations. R4 should only be backup router in case frame-relay circuit towards R3 is down.

R1 Config:
!
router ospf 1
 neighbor 172.16.0.4 cost 100
!

Note!
This solution 'neighbor address cost value' can only be used in 'ospf network point-to-multipoint' mode.
Pic. 3 - Path Verification.


Study Drill

Of course, there are usually more than one methods of accomplishing the same goal. If the task did not stipulate that configuration was supposed to be done on R1, we could change the original metric of the prefix on the advertising router(s) using the 'ip ospf cost' command. In case it was not loopback interface, we could also use the bandwidth command to manipulate the original cost calculation.

Wednesday, January 29, 2014

OSPF Path Selection with Bandwidth


Task 1
Remove Task 2 configuration from the previous lab.

Task 2
R2 chooses its FastEthernet interface as the outgoing path towards OSPF advertised destinations. Modify configuration on R2 so that it selects Frame-Relay interface instead. Use interface bandwidth command to accomplish this.

Questions
Try to answer the following questions:
  1. What is the significance of BW in show interface command with regard to OSPF?
  2. What does 'bandwidth' interface command do?
Lab Solution

Solution configuration can be accessed below (if you want to save it, click the link, then go to File-->Download):
https://drive.google.com/file/d/0BwE5C95tpjZOa1pvdlJmbUhIcXM/edit?usp=sharing

Task 1
Remove Task 2 configuration from the previous lab.

R2 Config:
!
interface FastEthernet0/0
 no ip ospf cost 65
!

Pic. 2 - R2 Current OSPF Routing Table (before configuration).


Note!
R2 calculates the best path based on the cost received from R1 by adding its own cost to reach R1 using two different interfaces:
  • FastEthernet (cost = 1)
  • Serial0/0 (cost = 64) 
Let's consider prefix 172.16.13.0/24 as an example of choosing the shortest path. 
There are two routers advertising 172.16.13.0/24:
  • R1 with the cost of 64
  • R3 also with the cost of 64

R1 cost of serial0/1 is calculated based on the formula (10^8 = 100,000,000):

cost = 10^8 / bandwidth_of_interface (bps)

Pic. 3 - R1 OSPF Cost of Serial0/1.


cost = 100,000,000 / 1,544,000 =  64 (rounded down)

Similarly, R3 is advertising 172.16.13.0/24 with the cost of 64.

Pic. 4 - R3 OSPF Cost of Serial0/1.


R2 chooses the least cost path:
  • R2--->R1 (FastEthernet0/0), then R1's directly connected destination
  • R2--->R1(Serial0/0), then R1's directly connected destination
It is worth noting that R1 has 172.16.13.0/24 directly connected (serial0/1) but can also reach it through R3 using its Serial0/1). It calculates the least cost path as well.

Take a closer look at the topology to understand it.


Task 2
R2 chooses its FastEthernet interface as the outgoing path towards OSPF advertised destinations. Modify configuration on R2 so that it selects Frame-Relay interface instead. Use interface bandwidth command to accomplish this.


R2 Config:
!
interface fastethernet0/0
 bandwidth 10
!

The cost of FastEthernet0/0 changes from initial 1 to 10000 (10 here is 10 kbps):


Pic. 5 - New OSPF Cost of FastEthernet0/0.


Now, R2 selects Serial0/0 as the best path:


Pic. 6 - R2's OSPF Routing Table.


Study Drill

The interface keyword 'bandwidth' followed by the number of kbps is NOT going to throttle the actual traffic. The rate stays the same. It only affects path selection routing protocols use (EIGRP and OSPF which factor in the bandwidth in the calculation).

This concept requires a bit of theory but also some hands-on verification in LSDB. Try to look at this from the practical perspective by looking in OSPF databases of R1 and R2.

Tuesday, January 28, 2014

OSPF Path Selection with Cost


Pic. 1 - Topology Diagram.


Task 1
Configure OSPF area 0 between R1 and R2 using Frame-Relay connection (Ser0/0).

Task 2
After you have completed Task1, check OSPF path on R2 towards the rest of the OSPF domain (check next-hop router's address). Configure R2 to use the newly created Frame-Relay link as the best path. Use interface cost command to accomplish this.

Questions
Try to answer the following questions:
  1. How does OSPF calculate the metric on Cisco routers by default?
  2. How can you influence the path selection in OSPF?
  3. How does Cisco OSPF router calculate the cost by default (as of writing this post)?
  4. How would you configure support so that the higher than 100Mbps interfaces have their cost automatically calculated?
Lab Solution

Solution configuration can be accessed below (if you want to save it, click the link, then go to File-->Download):
https://drive.google.com/file/d/0BwE5C95tpjZORlpIR0RDNnU5QW8/edit?usp=sharing


Task 1
Configure OSPF area 0 between R1 and R2 using Frame-Relay connection (Ser0/0).

Notice!
It is a good idea to check how R1 is already configured (ospf mode, authentication etc.) in order to configure R2 properly on Frame-Relay link.

R1 Current Config:
!
router ospf 1
 log-adjacency-changes
 area 0 authentication
 network 10.0.1.1 0.0.0.0 area 0
 network 172.16.0.0 0.0.0.255 area 0
 network 172.16.13.1 0.0.0.0 area 13
!

interface FastEthernet0/0

 ip address 172.16.12.1 255.255.255.0

 ip ospf authentication null
 ip ospf 1 area 0
 speed 100
 full-duplex
!
interface Serial0/0
 ip address 172.16.0.1 255.255.255.0
 encapsulation frame-relay
 ip ospf authentication-key G33K
 ip ospf network point-to-multipoint
 clock rate 2000000
 frame-relay map ip 172.16.0.1 103
 frame-relay map ip 172.16.0.3 103 broadcast
 frame-relay map ip 172.16.0.4 104 broadcast
 no frame-relay inverse-arp
!

Notice!
  • R1 uses simple password authentication in area 0 but it is disabled on Fas0/0.
  • R1 does not have Frame-Relay IP mapping towards R2 (R2 has this mapping towards R3; not shown here).
  • R1 ospf mode is point-to-multipoint
  • R1 authentication key = G33K

R1 Config:
!
interface serial0/0
 frame-relay map ip 172.16.0.2 102 broadcast
!

R2 Config:
!
interface serial0/0
 ip ospf authentication
 ip ospf authentication-key G33K
 ip ospf network point-to-multipoint
 ip ospf 1 area 0
!
Pic. 2 - OSPF Neighborship Verification.


Task 2
After you have completed Task1, check OSPF path on R2 towards the rest of the OSPF domain (check next-hop router's address). Configure R2 to use the newly created Frame-Relay link as the best path. Use interface cost command to accomplish this.

Pic. 3 - R2's Routing Table.


Notice!
For all OSPF destination R2 uses FastEthernet0/0 as expected.

Pic. 4 - R2's OSPF Costs of Interfaces.


The last thing to complete the goal is to change the cost of the interface preferring Serial0/0.

R2 Config:
!
interface FastEthernet0/0
 ip ospf cost 65
!

Pic. 5 - R2's Current Routing Table (after few seconds).


R2 prefers Serial0/0 as its outgoing interface for all OSPF networks.

Study Drill

There are bunch of methods to influence the path selection process in OSPF:

  • ip ospf cost
  • auto-cost reference-bandwidth
  • bandwidth
  • summarization a range of prefixes
  • neighbor costs (working in certain ospf modes)
  • etc.
It is worth mentioning that OSPF will calculate the cost based on the reference bandwidth (value of 100 representing 100,000,000 bps by default) according to the formula:

cost = ref_band / bandwidth_of_the_link.


Friday, January 24, 2014

OSPF Conditional Default Routing Using IP SLA


Pic. 1 - Topology Diagram.


Task 1
Remove the configuration used in the previous lab.

Task 2
On R2 configure a static route towards 10.0.8.8/32.

Task 3
Configure R2 so that it advertises the default route into OSPF domain as long as there is connectivity between R2 and SW2 Loopback0 interface (10.0.8.8). You should use IP SLA to accomplish the goal. IP SLA should track the object that will perform ping test every 3 seconds and the timeout should be set to 2 seconds.

Questions
Try to answer the following questions:
  1. What is an advantage of using this solution?
Lab Solution

Solution configuration can be accessed below (if you want to save it, click the link, then go to File-->Download):
https://drive.google.com/file/d/0BwE5C95tpjZOMUhnSmdRRFdER0E/edit?usp=sharing


Task 1
Remove the configuration used in the previous lab.

R2 Config:
!
no ip prefix-list VLAN28
!
no route-map CHECK
!
router ospf 1
 no default-information originate

!

Task 2
On R2 configure a static route towards 10.0.8.8/32.

R2 Config:
!
ip route 10.0.8.8 255.255.255.255 172.16.28.8
!

Note!
Make sure that SW2 has these two static routes configured for the next task to succeed.
!
ip route 172.16.0.0 255.255.0.0 172.16.28.2
ip route 10.0.0.0 255.255.0.0 172.16.28.2
!

Also, make sure that R2's FastEthernet is UP (we brought it down in the previous lab for testing purposes).

Task 3
Configure R2 so that it advertises the default route into OSPF domain as long as there is connectivity between R2 and SW2 Loopback0 interface (10.0.8.8). You should use IP SLA to accomplish the goal. IP SLA should track the object that will perform ping test every 3 seconds and the timeout should be set to 2 seconds.

NOTE!
Depending on which IOS version you use, the syntax to configure ip sla probe may be different. Try to check the syntax using: ip sla ?

R2 Config:
!
ip sla 1
 icmp-echo 10.0.8.8
 timeout 2000
 frequency 3
!
ip sla schedule 1 life forever start-time now
!

Pic. 2 - IP SLA Activated.


Notice!
My router's date and time are not set properly.

R2 Config:
!
track 1 rtr 1
!
ip route 1.1.1.1 255.255.255.255 Null0 track 1
!
ip prefix-list FAKE_NETWORK permit 1.1.1.1/32
!
route-map TRACK_FAKE_NETWORK permit 10
 match ip address prefix-list FAKE_NETWORK
!
router ospf 1
 default-information originate always route-map TRACK_FAKE_NETWORK
!

Note!
This solution requires the presence of a bogus/fake network entry in the routing table (here: 1.1.1.1/32). This is the condition for default route advertisement.

As long as 1.1.1.1/32 is present in the routing table, R2 advertises the default route into OSPF. This entry (1.1.1.1/32) will be present in the routing table as long as object 1 receives success from IP SLA 1 probe. 

Pic. 3 - R1 Receives Default Route.


Study Drill

This is a more reliable method of injecting a default route into OSPF since it will rely on non-direct failure.


Perform the test by shutting down 10.0.8.8 on SW2. See, if the default route has been withdrawn. Below, is what happens to IP SLA when SW2 shuts down its loopback0 interface.


Pic. 4 - IP SLA Statistics on R2 (SW2 Loopack Down).


As a result of that, 1.1.1.1/32 disappears from the routing table on R2.


Pic. 5 - 1.1.1.1/32 is Missing.


And R2 stops advertising the default route.


Pic. 6 - R1 Loses Default Route.


As soon as connectivity to 10.0.8.8 is restored, the default route R2 advertises into OSPF again.

Thursday, January 23, 2014

OSPF Conditional Default Routing


Pic. 1 - Topology Diagram.


Task 1
Remove the configuration used in the previous lab.

Task 2
Remove the existing default route injection on R2 (including default static route).

Task 3
Configure R2 to generate a default route into OSPF assuming that 172.16.28.0/24 is present in its routing table.

Questions
Try to answer the following questions:
  1. How can OSPF inject the default route based on the presence of specific route entry in its routing table?
Lab Solution

Solution configuration can be accessed below (if you want to save it, click the link, then go to File-->Download):
https://drive.google.com/file/d/0BwE5C95tpjZOVFZYQzlZQjQydUk/edit?usp=sharing


Task 1
Remove the configuration used in the previous lab.

R4 Config:
!
no access-list 1
!
router ospf 1
 no distribute-list 1 in
 no area 0 range 10.0.0.0 255.255.252.0
 discard-route internal
!

Task 2
Remove the existing default route injection on R2 (including default static route).

R2 Config:
!
no ip route 0.0.0.0 0.0.0.0 172.16.28.8
!
router ospf 1
 no default-information originate
!

Pic. 2 - R1's Routing Table.


Task 3
Configure R2 to generate a default route into OSPF assuming that 172.16.28.0/24 is present in its routing table.

R2 Config:
!
ip prefix-list VLAN28 permit 172.16.28.0/24
!
route-map CHECK permit 10
 match ip address prefix-list VLAN28
!
router ospf 1
 default-information originate always route-map CHECK
!

Pic. 3 - R1's Routing Table.


Now, in order to simulate the removal, shutdown FastEthernet0/1 on R2. It should no longer propagate the default route.

Pic. 4 - R2 Loses access to 172.16.28.0/24.


As a result of that, R1 no longer receives the default route from R2. This can be seen in the 'debug ip routing' on R1 activated before R2 shut down it Fas0/1 interface.

Pic. 5 - Debug IP Routing on R1 Before R2's Fas0/1 Shutdown.


Study Drill

OSPF command 'default-information originate' is already a conditional route injection. It will originate the default route into OSPF if the router has the default route itself. In case, the router with 
'default-information originate' command loses the default route from its routing table, it will withdrawn the default route from OSPF domain.

OSPF can also originate the default route, without having it in its routing table. You need to add the 'default-information originate always' keyword (the one in red), to originate the default route unconditionally.

However, OSPF also uses conditional default route injection method in which the router will check for presence of any prefix specified in the route-map, just like presented in this lab.


Wednesday, January 22, 2014

OSPF Summarization - Discard Route


Pic. 1 - Topology Diagram.

NOTE!
Make sure that the tasks in the previous lab are completed before proceeding with this lab. Also, this is NOT a best practice lab. It creates a potential problem and provides solution to it.

Task 1
On R4 configure distribute-list filtering area 0 prefixes so that they are still present in the LSDB but not in the routing table of R4. Prefixes to be filtered out are as follows:
  • 10.0.1.1/32
  • 10.0.2.2/32.
Task 2
Configure summary route 10.0.0.0/22 on R4 so that the area 3 does not receive more specific LSAs in the range given (10.0.0.0 - 10.0.3.255).

Task 3
Ensure that R5 has connectivity to the routes summarized by R4. Configure R4 to accomplish this.

Questions
Try to answer the following questions:
  1. What problem can prefix summarization create in OSPF domain?
  2. What do OSPF, EIGRP and BGP create in their routing table while doing route summarization?
  3. What does Null0 summary is designed to do?
  4. What problem is this task list going to create?
Lab Solution

Solution configuration can be accessed below (if you want to save it, click the link, then go to File-->Download):
https://drive.google.com/file/d/0BwE5C95tpjZOang4ZTFwcXNpZEE/edit?usp=sharing

Task 1
On R4 configure distribute-list filtering area 0 prefixes so that they are still present in the LSDB but not in the routing table of R4. Prefixes to be filtered out are as follows:

  • 10.0.1.1/32
  • 10.0.2.2/32.
Pic. 2 - R4's OSPF Table Before Filtering.


R4 Config:
!
access-list 1 deny 10.0.1.1
access-list 1 deny 10.0.2.2
access-list 1 permit any
!
router ospf 1
 distribute-list 1 in
!

Pic. 3 - R4's OSPF Table After Filtering.


10.0.1.1/32 and 10.0.2.2/32 are now missing (but they are still in LSDB).

Task 2
Configure summary route 10.0.0.0/22 on R4 so that the area 3 does not receive more specific LSAs in the range given (10.0.0.0 - 10.0.3.255).

R4 Config:
!
router ospf 1
 area 0 range 10.0.0.0 255.255.252.0
!


Pic. 4 - OSPF Routing Table on R4.


NOTE!
R4 has the default route as per previous lab, but since summarization has been configured, it also creates 10.0.0.0/22 summary route pointing to Null0 interface (default behavior of OSPF, EIGRP, BGP).

Task 3
Ensure that R5 has connectivity to the routes summarized by R4. Configure R4 to accomplish this.


Pic. 5 - R5's Routing Table After R4's Summarization.


R5 receives the summary route 10.0.0.0/22 as presented in pic 5. When it sends packets towards 10.0.1.1 or 10.0.2.2 it sends the packets to the next-hop router 172.16.45.4 (R4). Here's the result of the ping test:


Pic. 6 - R5 Ping Test to Summarized Prefixes.


R4 sends ICMP host unreachable to R5!

R4 has the summary route with Null0 interface as the next hop for more specific routes (10.0.0.0 - 10.0.3.255 in this case). This summary route pointing to Null0 interface assumes that R4 has more specific entries in the routing table (filtering in task 1 has removed those entries from the routing table). Even though R4 has the default route It will NOT use it due to the presence of summary route. Packets are being dropped on R4 creating a black hole.

Solution to this 'unorthodox' design could be removal the discard route (null0) from the routing table:

R4 Config:
!
router ospf 1
 no discard-route internal
!

This will remove the discard route (null0) from OSPF routing table (compare with pic. 4).


Pic. 7 - OSPF Routing Table on R4.


NOTE!
Only default route is present now.

Pic. 8 - R5 Ping Test.


Study Drill

While using route summarization it is possible to create a 'black hole' for the traffic or sub-optimal routing in the domain. It is imperative to remember that route summarization introduces a summary route with the Null0 interface as the next hop. It is called 'discard route'. It prevents a router from using a shorter match (default route for instance), if the more specific destination network is not present in the routing table. 


In this lab, the problem has been introduced which resulted exactly as per 'discard route' role. This design if definitely not the best practice. It only shows the possibility of removing the 'discard route' from OSPF table in order to accomplish the task given stipulations.